


Station Configuration#
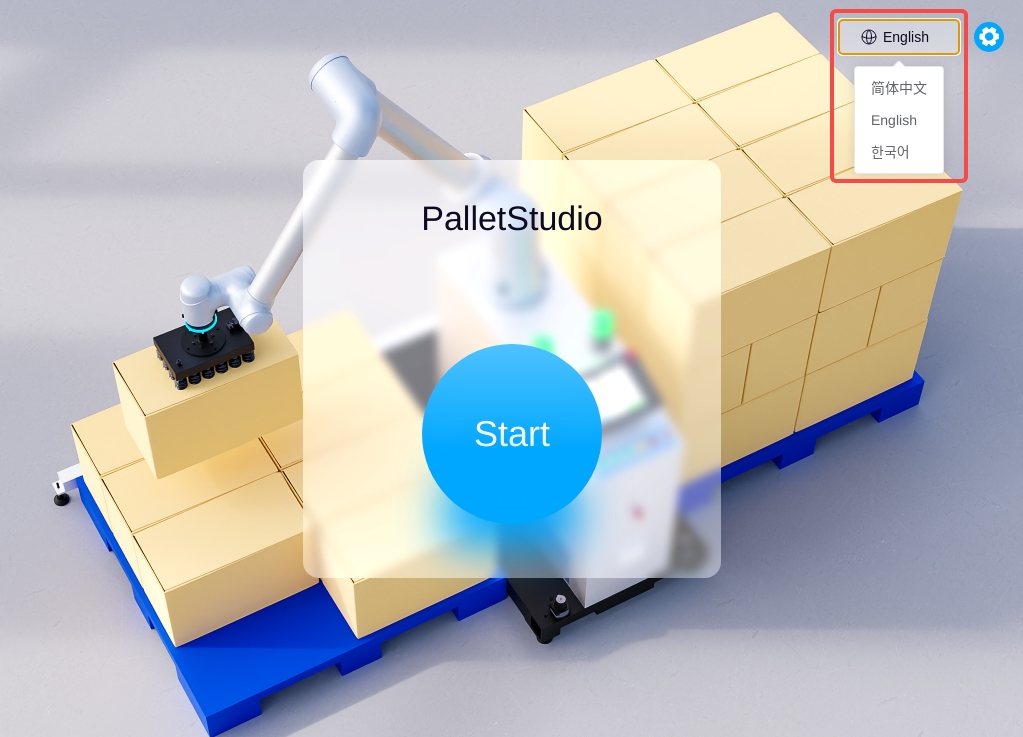
Language Configuration#
On the startup page, click “Simplified Chinese” in the upper right corner to switch the language, as shown in the following figure.
Station Configuration#
Configuration Operations#
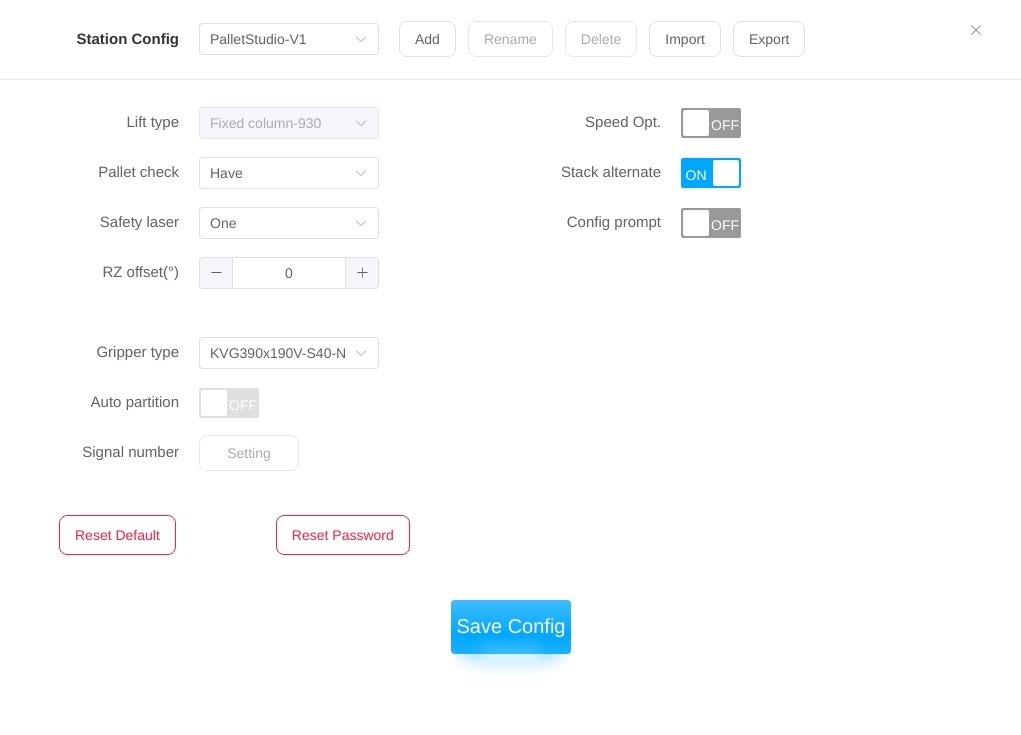
On the Startup Configuration page, click the  icon in the upper right corner, enter the authentication password, and enter the Workstation Configuration
page, which displays the Workstation Configuration radio box at the top of the page, and the buttons related to the operations of adding, renaming, deleting
, importing, and exporting of the Workstation Configuration, as shown in the following figure.
icon in the upper right corner, enter the authentication password, and enter the Workstation Configuration
page, which displays the Workstation Configuration radio box at the top of the page, and the buttons related to the operations of adding, renaming, deleting
, importing, and exporting of the Workstation Configuration, as shown in the following figure.
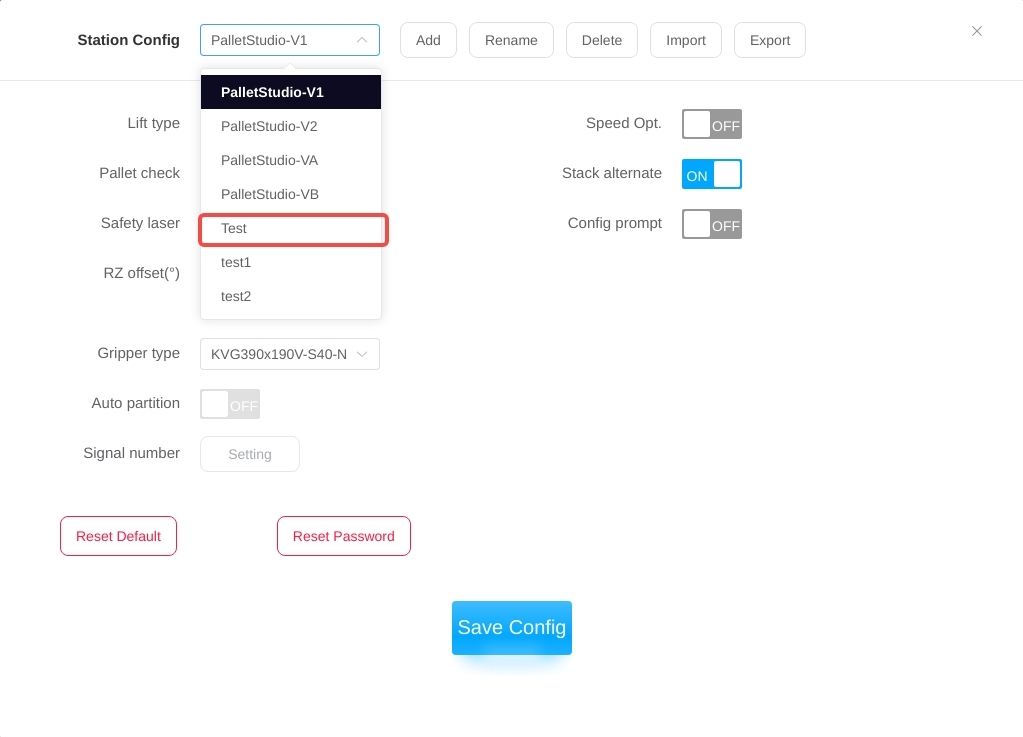
Station Configuration radio box
The Workstation Configuration radio box drop-down list shows that the system displays all of the system’s workstation configurations, including the system’s preset workstation configurations and user-defined workstation configurations, as shown in the following figure.
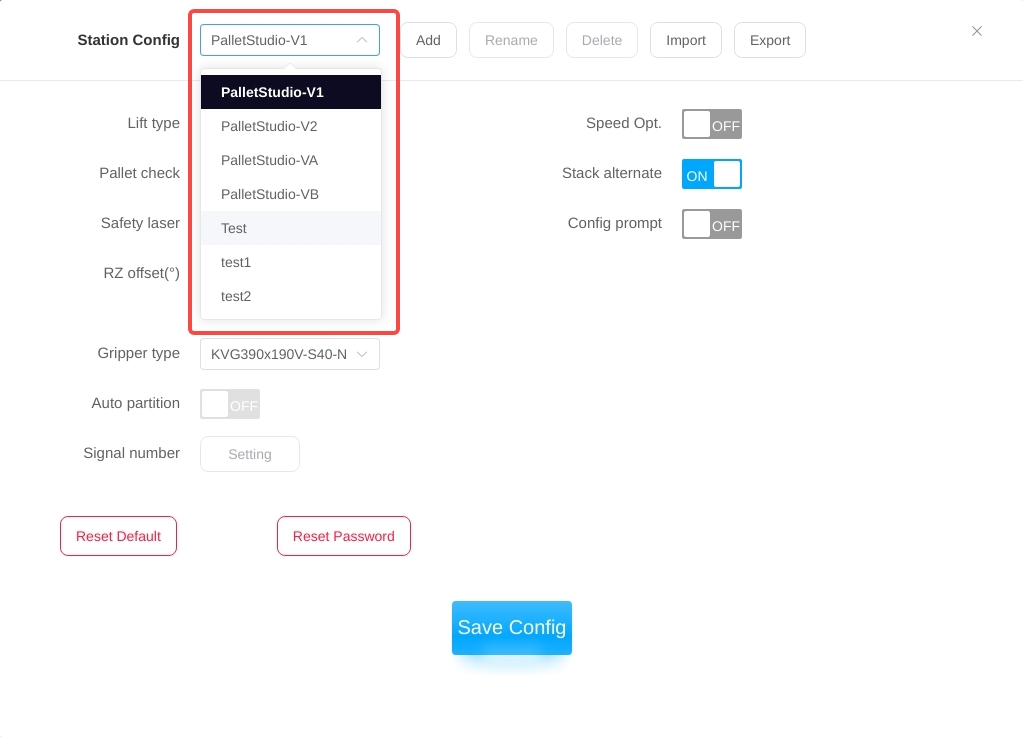
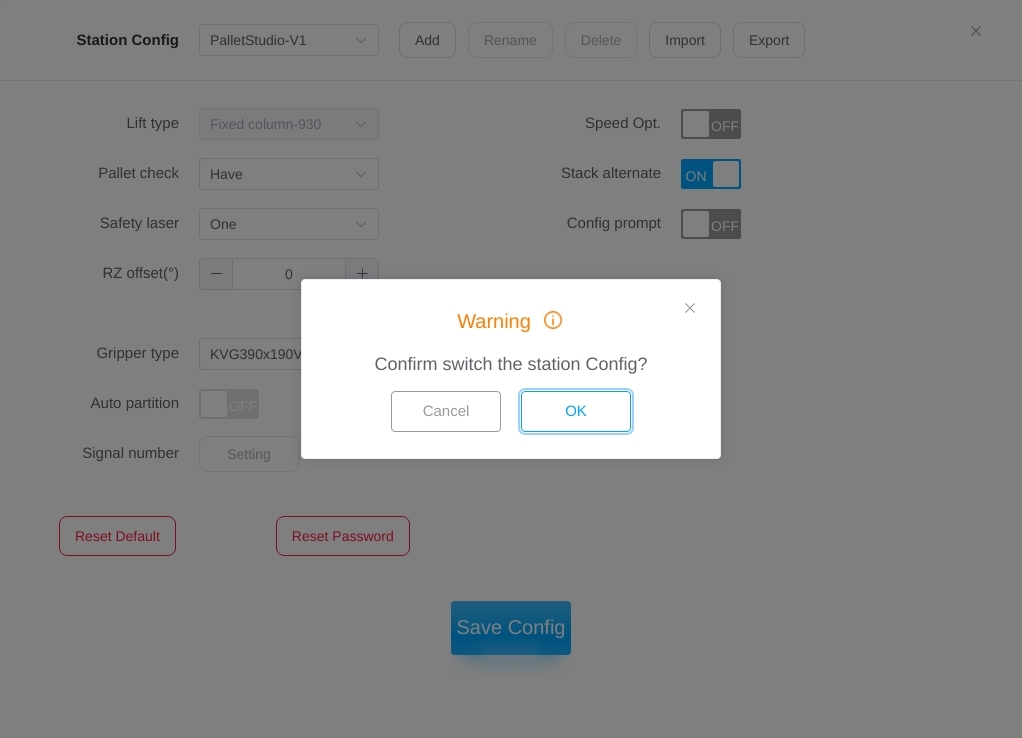
Among them, PalletStudio-V1, PalletStudio-V2, PalletStudio-VA, PalletStudio-VB are the system preset station configurations and are fixedly displayed at the top of the drop-down list, and the user-defined station configurations are displayed behind the preset station configurations in order. Click on the different station configuration options to switch, as shown in the figure below, users can click on the “OK” button to complete the switch, click on the “Cancel” button to cancel the switching operation.
Add
Click the “Add” button to bring up the virtual keyboard, enter the name of the workstation configuration, such as “Test”, after adding successfully, the “Created Successfully” message will pop up, and at the same time, the Workstation Configuration The drop-down list of checkboxes will show the newly added configuration name, as shown in the following figure.
Rename
Click the “Rename” button to bring up the virtual keyboard and enter the new name of the workstation configuration to rename the workstation configuration.
Note
Tips: The system’s preset station configuration files cannot be renamed! Only user-defined station configurations can be operated.
Delete
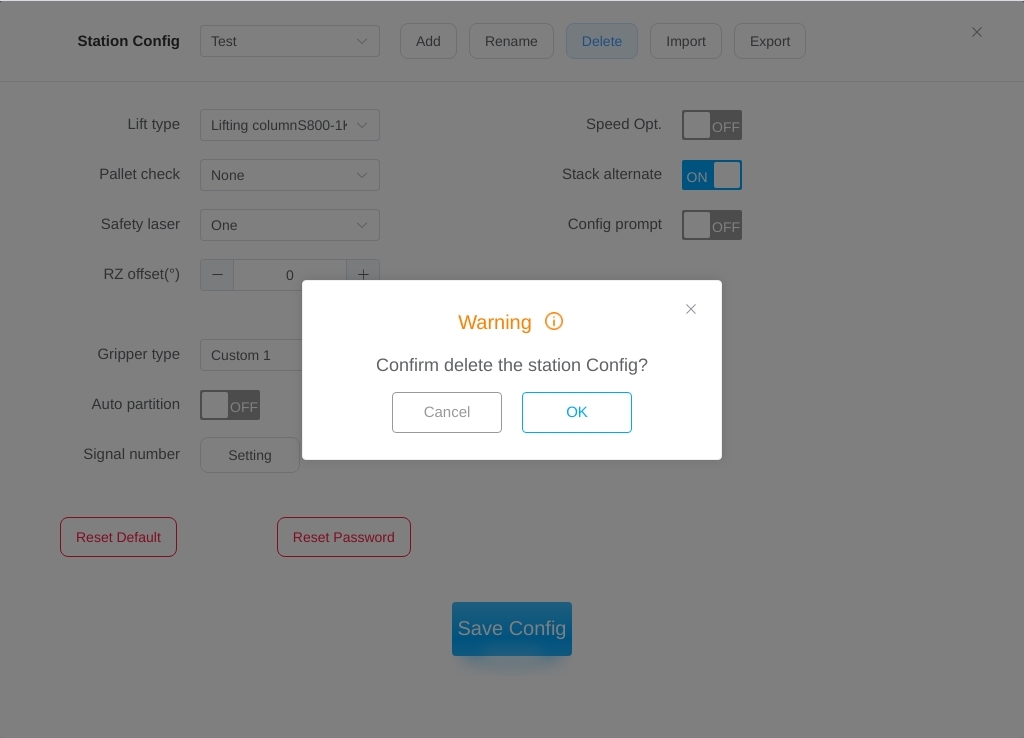
Click “Delete” button, the pop-up window prompts the following figure, the user clicks “Confirm” button to delete the user-defined configuration of the current workstation; the user clicks “Cancel” button to cancel the deletion operation. Click “Cancel” button to cancel the deletion operation.
Note
Tips: System preset station profiles cannot be deleted! Only user-defined station configurations can be operated.
Import
Click the “Import” button to import a station configuration file from an external removable storage device, select a removable storage device as shown below.
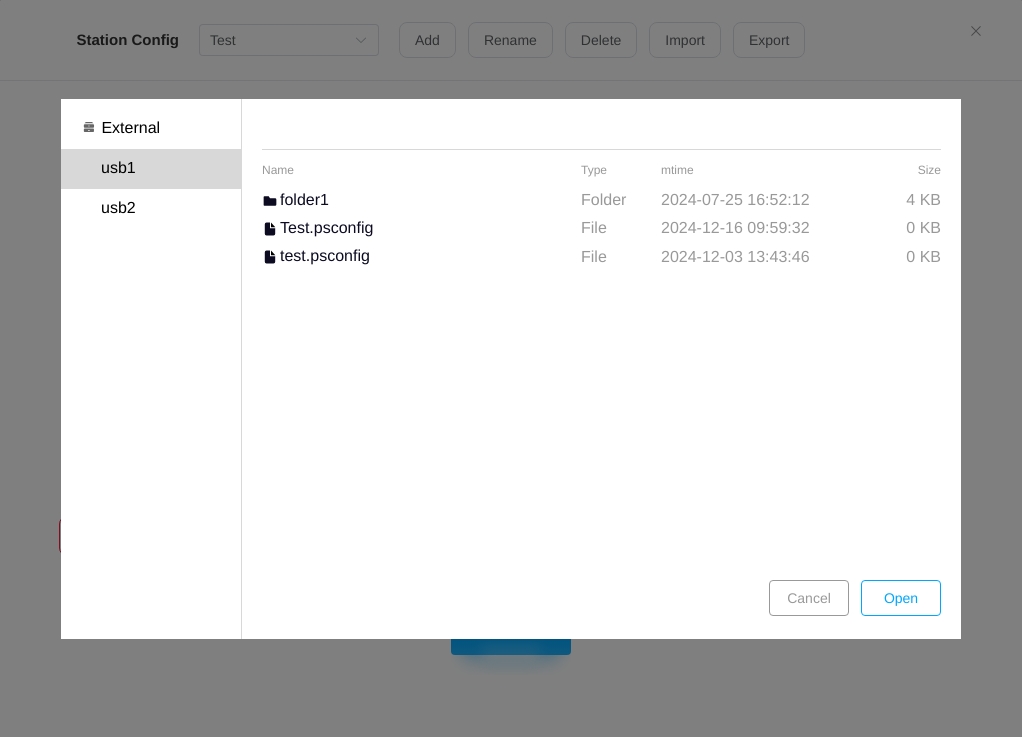
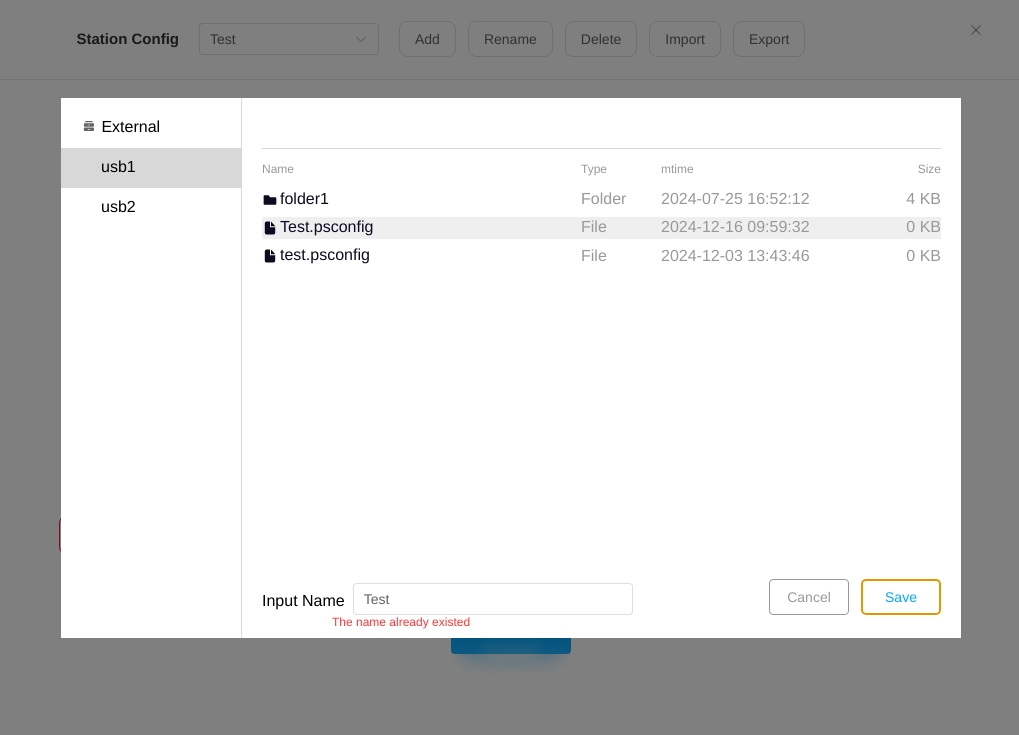
Select the configuration file with “.psconfig” extension and click the “Open” button. When importing the selected configuration file and the system has a file renamed, a pop-up window will be prompted as shown below.
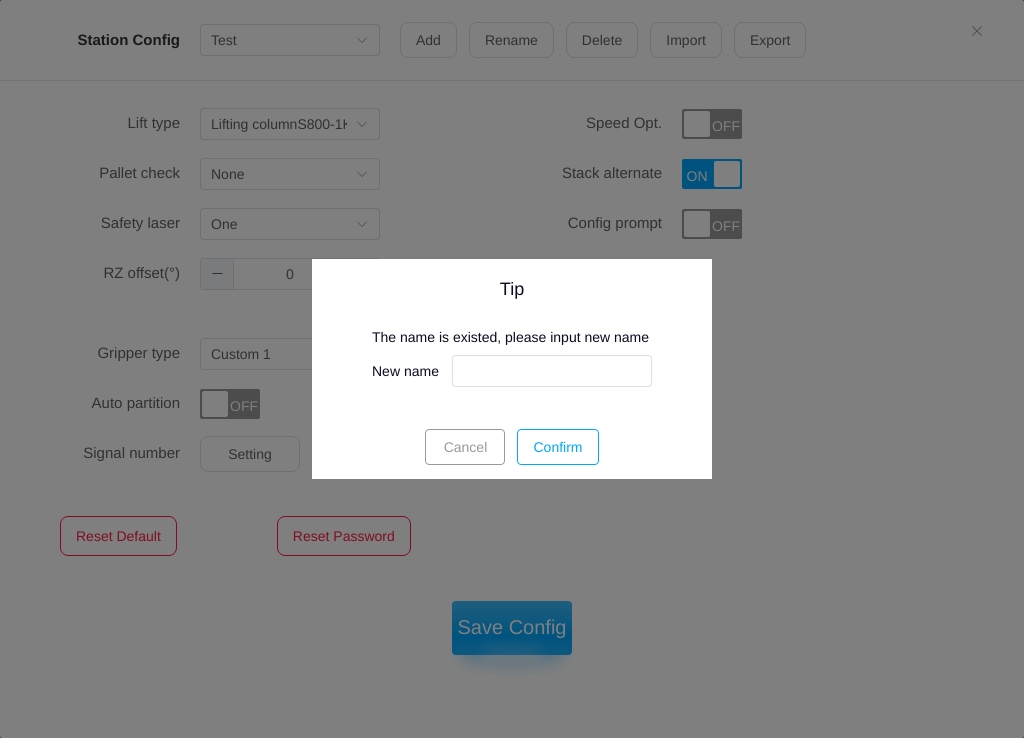
Enter the new name of the configuration, click the “Confirm” button, the “Import Configuration Successfully” prompt will be displayed, and the name of the imported configuration file will be displayed in the drop-down list of the Workstation Configuration radio box.
Export
Click the “Export” button and select the path to save the file, as shown in the following figure. Click the “Save” button to display the “Export Configuration Success” prompt, that is, the current workstation configuration is successfully exported to an external removable storage device, the exported workstation configuration file suffix name is “.psconfig”.

If the exported workstation configuration file exists under the selected path, a prompt will appear at the bottom of the pop-up page indicating that the name is already in use. In this case, users can rename the file and click Save to proceed with the export.
Configuration Parameter#
Workstation configuration parameters include: column model, clear pallet detection, safety laser, end RZ correction, suction cup gripper model (TCP parameter setting), suction cup automatic zone calculation (zone area setting), signal number setting, speed optimization and alternation of pallet types between layers and operation configuration confirmation prompts to confirm the setting is on or off.
Column Model Number:
Column Model radio box options available are Fixed Column-930, Fixed Column-1050, Lifting Column S800-1K and Lifting Column S600-1K.
Note
Tips: Column models cannot be modified in the system’s preset station profiles!
Palletizing Inspection:
The “Palletize Detection” radio box allows you to select whether the palletizing signal is absent or present. When you select “No” or “Yes” for palletizing signal, the user will check whether the signal is available or not, and the count will be cleared if the signal is available, otherwise, a pop-up window will be displayed to ask whether the user wants to force palletizing or not.Otherwise, a pop-up window will be displayed to ask the user whether to force de-palletize, and the current count will be cleared when the user selects Yes.
Safety Laser:
The Safety Laser radio box can be selected with none, 1, or 3 options.
End RZ correction (°):
End RZ correction value setting box, fill in the error parameter after metering to correct the RZ fixed deviation of the TCP.
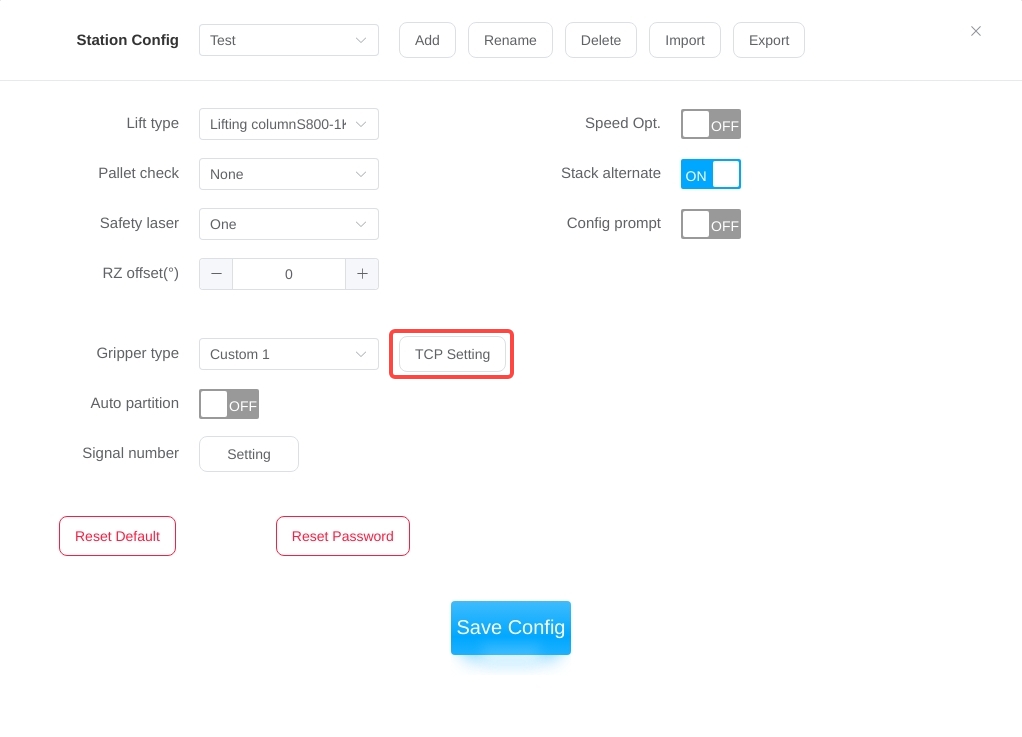
Suction Cup Grabber Model Number:
The suction cup gripper model number radio box options are ETV13-300-1, ETV13-300-2, KVG390x190V-S40-NA2, KVG390x190V-Multi-District, DKB240017, Custom 1, Custom 2 and Custom 3 for a total of 8 options.The first 5 are the system’s preset suction cup gripper models, and the last 3 are for user-defined gripper models. The “TCP Parameter Setting” button will be displayed only when the user selects the customized option, as shown below.
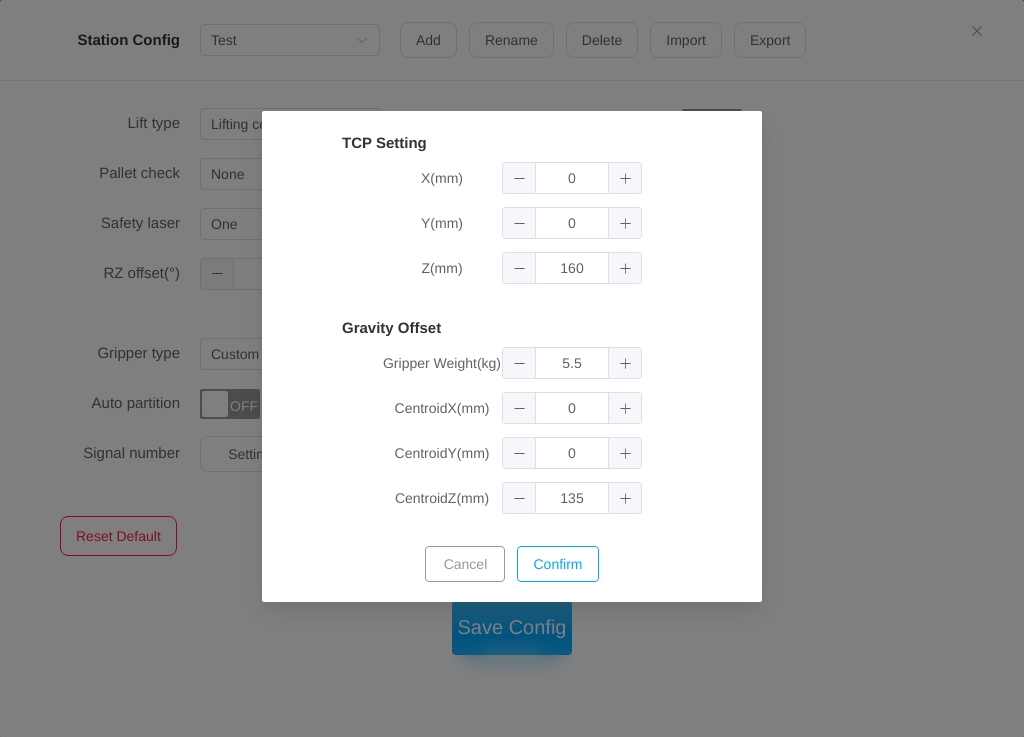
Click the “TCP Parameter Setting” button to enter the TCP parameter setting interface pop-up window as shown below, users can modify the gripper’s TCP parameters XYZ offset value, gripper weight, center of mass parameters.
Note
Tips: Gripper models cannot be customized with the system’s preset station profiles! Only the gripper models preset by the system can be selected.
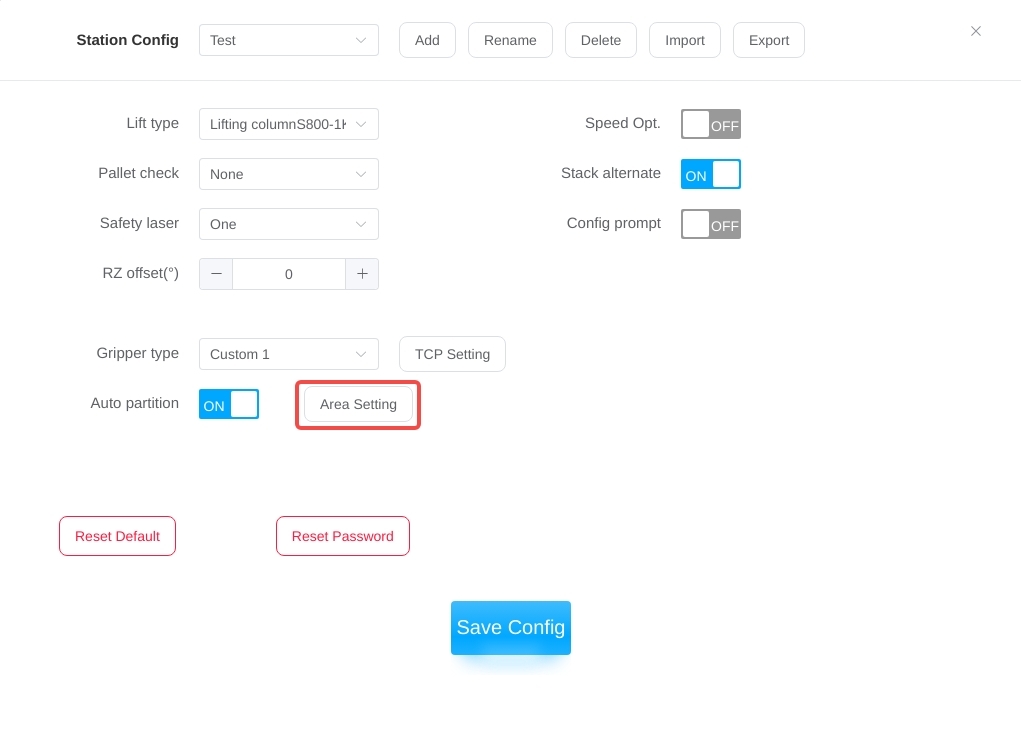
Automatic Suction Cup Segmentation:
When the Automatic Suction Cup Segmentation enable switch is turned on, the manual open/close partition enable button in the configuration mode is disabled, and the vacuum signal and feedback adopt one-to-one correspondence, which cannot be changed. Only when the Automatic Suction Cup Segmentation is enabled will the “ZONE AREA SETTING” button be displayed as shown below.
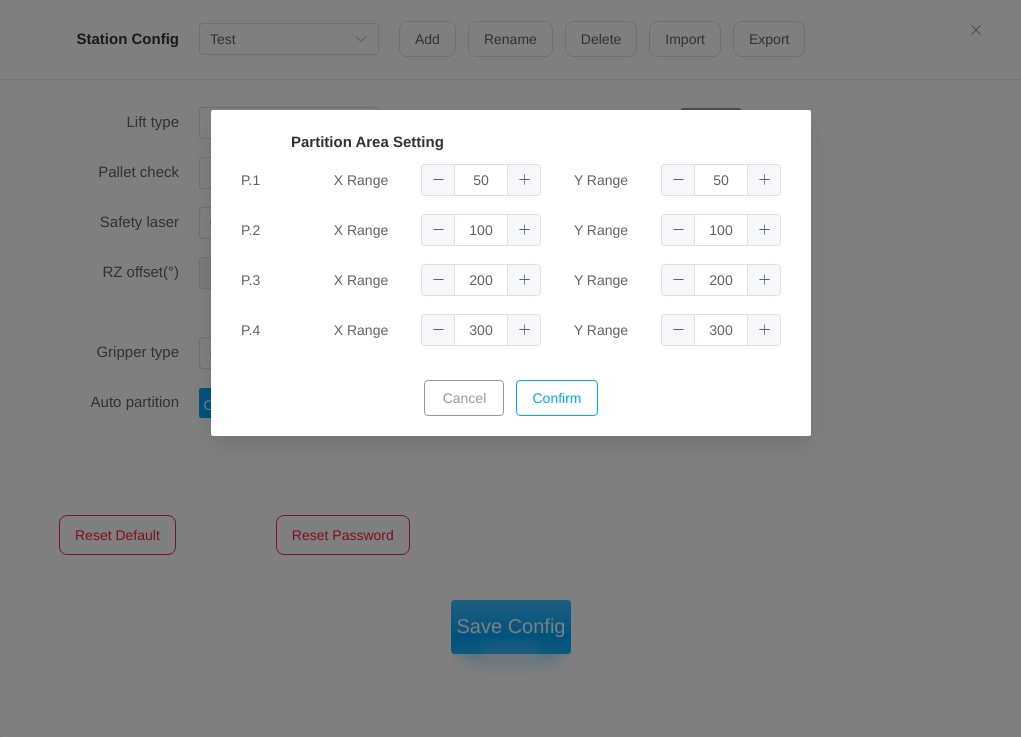
When user clicks the “Partition Area Setting” button, the partition area setting pop-up window will be displayed as below, user can set the range of TCP axis X and axis Y for each partition, and the system will control the automatic switching of the IO signal according to the set range of axis X and axis Y as well as the size of the corresponding box.
Note
Tips: When a non-custom gripper is selected for the suction cup gripper model, the suction cup auto zone count enable switch is disabled! When the Automatic Suction Cup Segmentation Enable switch is enabled, the signal count setting is not available!
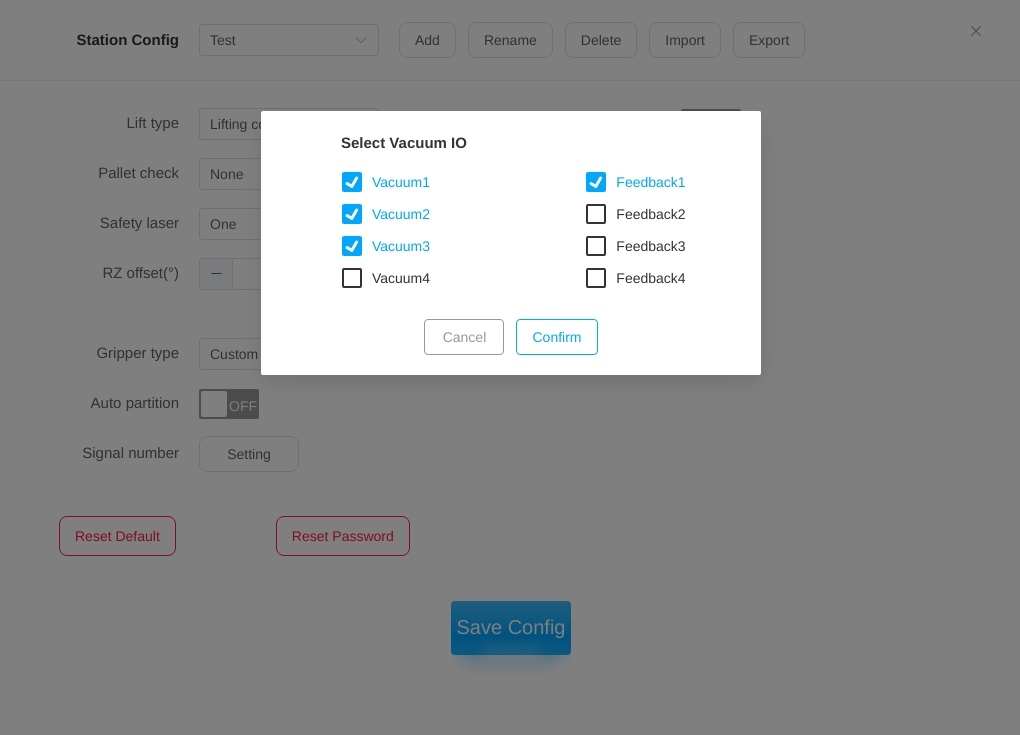
Signal Count Setting:
The Signal Count Setting is used to set the number of vacuum signals for the customized gripper. Clicking on the “Settings” button displays the Vacuum IO selection pop-up window as shown below.
Note
Tips:
The signal count setting button is disabled when the suction cup gripper model is non-customized;
The Signal Count Setting button can only be set if the suction cup gripper model is customized and the suction cup partition calculation is not enabled;
When the number of signals is set, the number of vacuum signals and feedback signals can be double-selected;
The number of vacuum signals may be greater than the number of feedback signals, but not less than the number of feedback signals;
Speed Optimization:
When the Speed Optimization switch is selected to be enabled, the robot beats are increased.
Interlayer Stack Type Alternation:
When the layer pallet alternation switch is selected not to be enabled, palletizing no longer alternates between AB pallets, and each layer’s pallet is determined based on the selection of the starting pallet within the Pallet Configuration page in Configuration Mode.
Run Configuration Confirmation Prompt:
After the Run Configuration Confirmation Prompt switch is selected to be enabled, a pop-up window will first prompt the user to select the current production recipe when clicking Start in Run mode.
After configuring the above parameters, click the “Save Configuration” button at the bottom of the page.
Restore Default Configuration#
If you want to restore the current workstation configuration parameters to the default values, click the “Restore Default Configuration” button, the pop-up window is shown below.
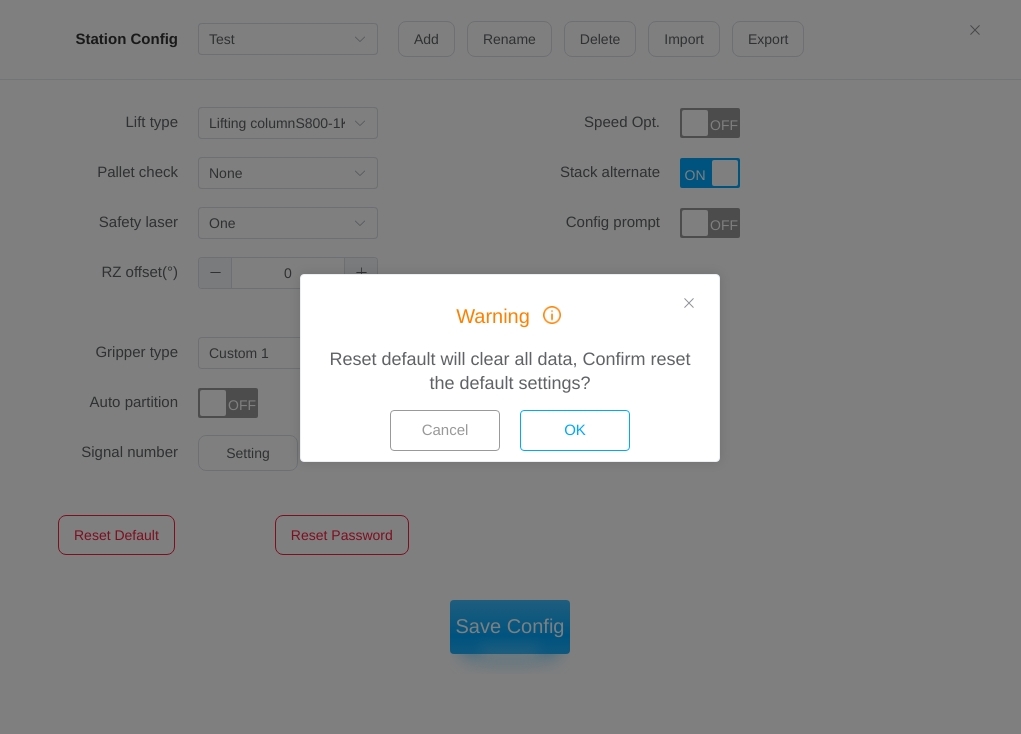
After the user confirms, all the data displayed in the current configuration page will be cleared and the default settings will be restored, and the user needs to manually click “Save Configuration” to take effect.
Reset Password#
If you need to reset your password, click on the “Reset Password” button and the pop-up window will appear as shown below.
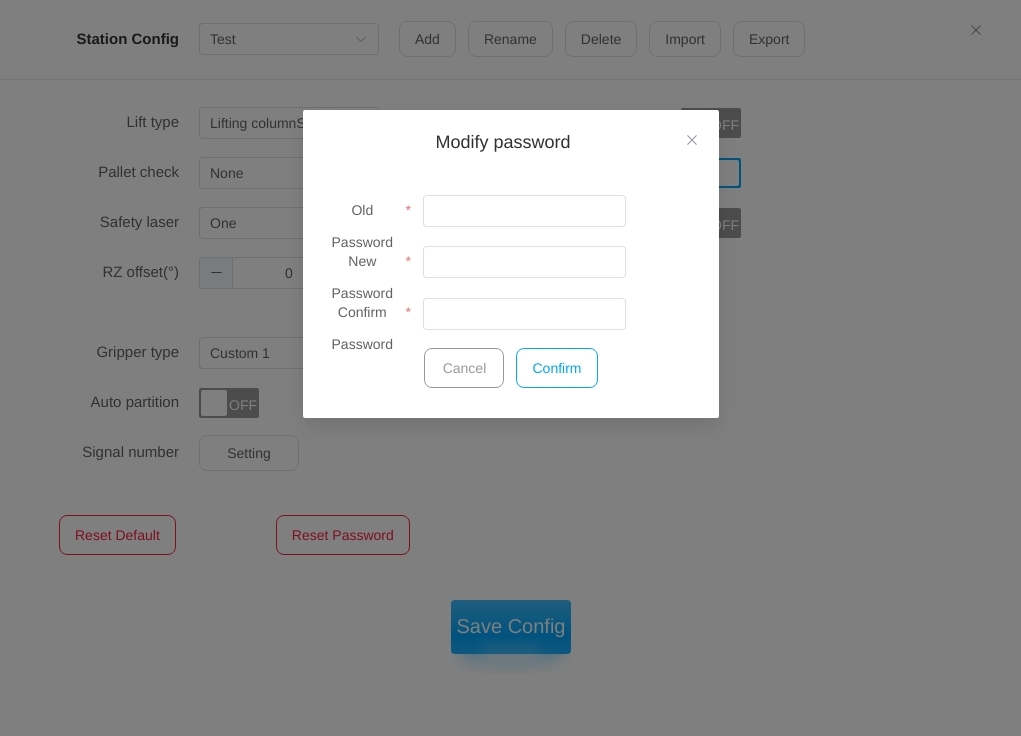
Enter the original password first, then enter the new password you want to change, enter the new password again and click the “Confirm” button.