


Device Login#
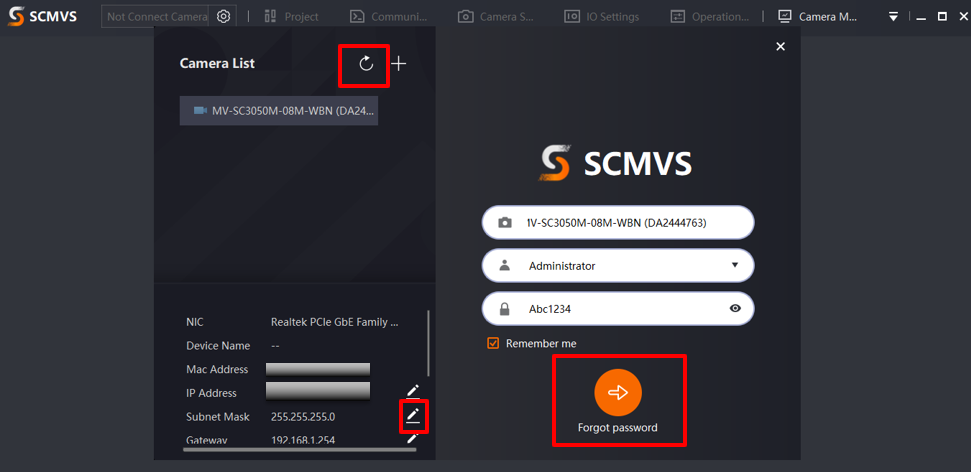
The Login screen will be displayed after the client is opened. You must log in to the device first before you can operate it. The login screen has a refresh button, where you can refresh the list of connected devices. Select the desired device to log in, view the device’s information, and modify the IP address if needed. Then enter the device’s password (Abc1234). When adding remotely, ensure that the network and the PC are connected, otherwise the process will fail.
To operate the device using the client, you must first log in to the device first. Ensure the device is available for log in.
Procedure:
Select the device to be logged in, and the device information will be displayed on the right side of the login screen as “Device Model + Serial Number or Device Name + Serial Number”.
Click on
 at
at  to select the ‘login’ option. For the first login or when no other role has been created yet, only the ‘administrator’ role can be chosed to login. After the administrator has created other roles, you can select those roles to login by entering the corresponding login password.
Note
If you have not created other roles, you need to log in to the client with the administrator role first, then create other roles before you can use them.
Enter the devuce passowrd at
 . The default administrator password is Abc1234.
Click
 to see the entered password in either plaintext or ciphertext. You can verify the password enetr by viewing the password in plaintext state.
Optional: Select “Remember Password” to save you time when logging on in the future.
Click
 or press ‘eneter to log in to the device and make the relevant seetings.
Optional: Click on
 in the top left corner of the main screen to return to the login screen, select
  to see other avaiable devices that can be logged in, and repeat the steps above to log in to another device.
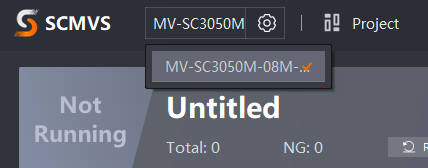
Optional: Click on the upper left corner of the main screen to switch the device selected, as shown in the following figure.
Note
The factory default password is Abc1234. For security considerations, it is strongly recommended to change the password.
The client allows for multiple devices to be logged in at the same time, but only one (the current selected device) can be operated.
Enumerating Devices#
The client will automatically refresh and display the devices on the current local area network at regular intervals. You can also manually refresh by clicking on  in the camera list. Additionally, you can click
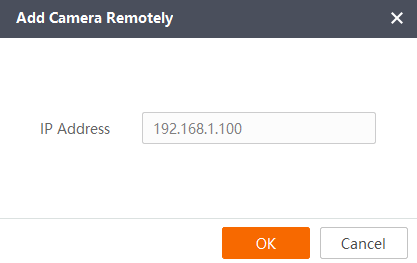
  to add a remote camera, enter the device IP address, and click OK, as shown in the picture below.
Note
When you add a device remotely, make sure that the device is connected to the PC’s network, otherwise it will fail to be added.
Device Status#
The camera list uses different icons to represent the device in different states, and the operations that can be performed will vary. Please use the table below as a reference:
Icon
|
State
|
Meaning
|
|---|---|---|
|
Available |
The device is avaiable. Select the device and enter the password to log in |
|
Connected |
The device is connected and can perform operations |
|
Occupied |
The device is currently connectetd to another software or process and cannot be logged in thorugh the current client. Please disconnect the device through the other software or process before logging in with the current client |
|
Unreachable |
The IP address of the device is unreachable. Please double check the IP address and modify the IP address if needed |


Modifying the Device IP Address#
The IP address of the device can also be modified in the camera list, and the operation differs depending on the state of the device. Prerequisites: The device is in the Available or Unavailable state.
Procedure:
Select the device whose IP address you want to modify.
Right-click and select Edit IP address or click on the IP Address, Subnet Mask, or Deafault Gateway to access the Edit IP address window, as shown in the following figure.
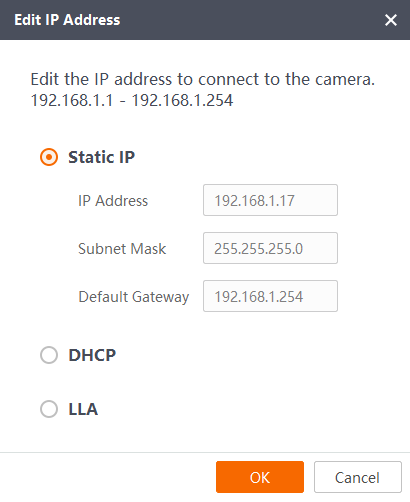
Select the IP configuration type according to the requirements, which are Static IP, automatically assigning IP (DHCP) and automatically assigning IP (LLA), please refer to the following table for the description of the IP configuration type.
IP type
|
Meaning
|
|---|---|
Static IP |
The device communicates with the PC with the set IP address, netmask and default gateway. It is reccomended to use this type of IP |
Automatic Assinging IP(DHCP) |
The deviec’s IP negotiates with the the PC. The factory default settimgs is assigned to the IP address automatically |
Automatic Assinging IP(LLA) |
The IP address of the deivce uses the 169.254 network segment for negotiation with the PC |
Click OK.
Note
If you switch the IP configuration type of the device, the device automatically reboots to make the changes take effect.